Showing posts with label Tutorial Tuesday. Show all posts

Tuesday, March 10, 2015

Crochet: Catherine Wheel


Does anyone else have projects that they think are ugly yet the most beautiful thing they've ever seen? Well this is one of those! I have a few crochet projects going on and this is my "no goal project" that I pick up every now and then. I've found that crocheting really helps me to relax and not worry about work stress. The repetitive movements and patterns clear my head. (However, when it becomes too repetitive I check out and get bored.) This one is perfect! It is called the Catherine Wheel, and I actually have two projects going on with it.

Inspiration: 


I saw this picture on Instagram from karsyndupree and just fell in love! I'd never seen a crochet pattern like this, and I knew I had to try it. I flipped through my Reader's Digest Ultimate Sourcebook of Knitting and Crochet Stitches and low and behold found it! The Catherine Wheel! **I highly recommend this book if you are an avid knitter or crocheter. It is stocked full of stitches and a lifesaver** However, the book only lists stitch instructions, and when it comes to crocheting, I have to have a stitch chart. So off I searched for one!

Stitch Chart:


I found this at ABC Knitting Patterns. I liked this one the most because it colored each row separately. It really keeps things clear when I'm trying to figure out which row to start with after I've put down the project for a bit.

My Project:


I decided to use yarn from my stash and just go for it! I didn't have anything in mind (which is why it is an awkward length) and started working on the stitch. I fell in love! It's quite easy and repetitive just enough to take my mind off my day. I've had the variegated yarn for a few years now. I wish I'd bought more so that I could make a larger project with it, but it is what it is. The project stays interesting to me because I never know what each row will look like thanks to the colorful yarn! I think this is what adds that ugly yet beautiful factor to it.

Stitches:


I can't wait to see what path my project takes me on! I have to say that this is my favorite crochet stitch now! Do you have a favorite? I'd love to try it out!

Tuesday, June 25, 2013

Tutorial Tuesday: Retro Pot Holder (Folded Stars)


It's Tutorial Tuesday!! Woohoo! For today's I will be featuring the Retro Pot Holder Tutorial found at Going Sew Crazy. This tutorial is a little sentimental to me for various reasons. First, it was one of my very first pins that I pinned to Pinterest. Second, it was one of the first things I had ever sewn that wasn't clothing or a quilt.   Third, I took pictures of every step because I knew that one day I'd want to have a sewing blog! After a little over a year, I'm finally getting to it! In fact, you can see my first quilt in the background of the above picture... maybe one day I'll share it with y'all... when it's done!

Because it was one the first "things" I ever made, I followed the instructions pretty much to a T (tee??). The only thing I changed was that I liked being able to see the fold on my points so I had those face up and not down. Oh and I'm pretty sure I just used a large glass I had to trace circles onto my fabric, so I have no idea what size they are. Here's my pictures!


And there you have it! My picture steps are complete. I quilted it in the creases of the folds. A little embarrassing story... I didn't know about a quilting foot and was so annoyed that my machine couldn't do it with the normal foot on that I just took the foot completely off and sewed it that way! My fabric was going all over the place, but I persevered! Luckily, now I know about a lot things I didn't know about back then ;)

Below is another pot holder I made for my dear friend (who is expecting a baby girl soon! Guess who's making a baby quilt?!), and one that I found in an antique store.

The one I made for Ren along with a little doodle.

The one I found at the antique store.

I hope you enjoyed looking at the Tutorial Tuesday! This project is rather quick and easy, so what are you waiting for!? Go make one!


Tuesday, June 18, 2013

Tutorial Tuesday: Linky Party #2


So this week for Tutorial Tuesday I've decided to host a linky party! This will most likely be happening every other Tuesday. I don't always have time to try out a new tutorial, so this allows me time to do sew (hehe), and for you to share what you've been working on.

The Inlinkz website has changed some of their policies, so I have to pay to show thumbnails of your creations now.... I'm a poor college student who would rather spend her spare change on fabric. Sorry if this upsets some of you. You'll just have to be surprised by what you see after you click on someone's name :)

Rules (just a few!) for entering:
1) Link up must be of a project you recently made or are currently making in the form of a blog post or Flickr picture. This can be anything sewing related.
2) Project was preferably made using a tutorial you found online or one that you created.
3) There must be a link back to the tutorial, if one was used.
4) Please link back to this post and/or put a button on your post (found below). This is completely optional, but would be greatly appreciated!
5) Visit a few of your fellow quilters' posts, and leave them lovely comments!
**Due to not being able to show thumbnails anymore, I've lengthened the characters allowed in the "Name" line to be 100. Feel free to put a very little description of what you're linking too!


Thursday, June 13, 2013

Tutorial Tuesday/Thursday: Triangles


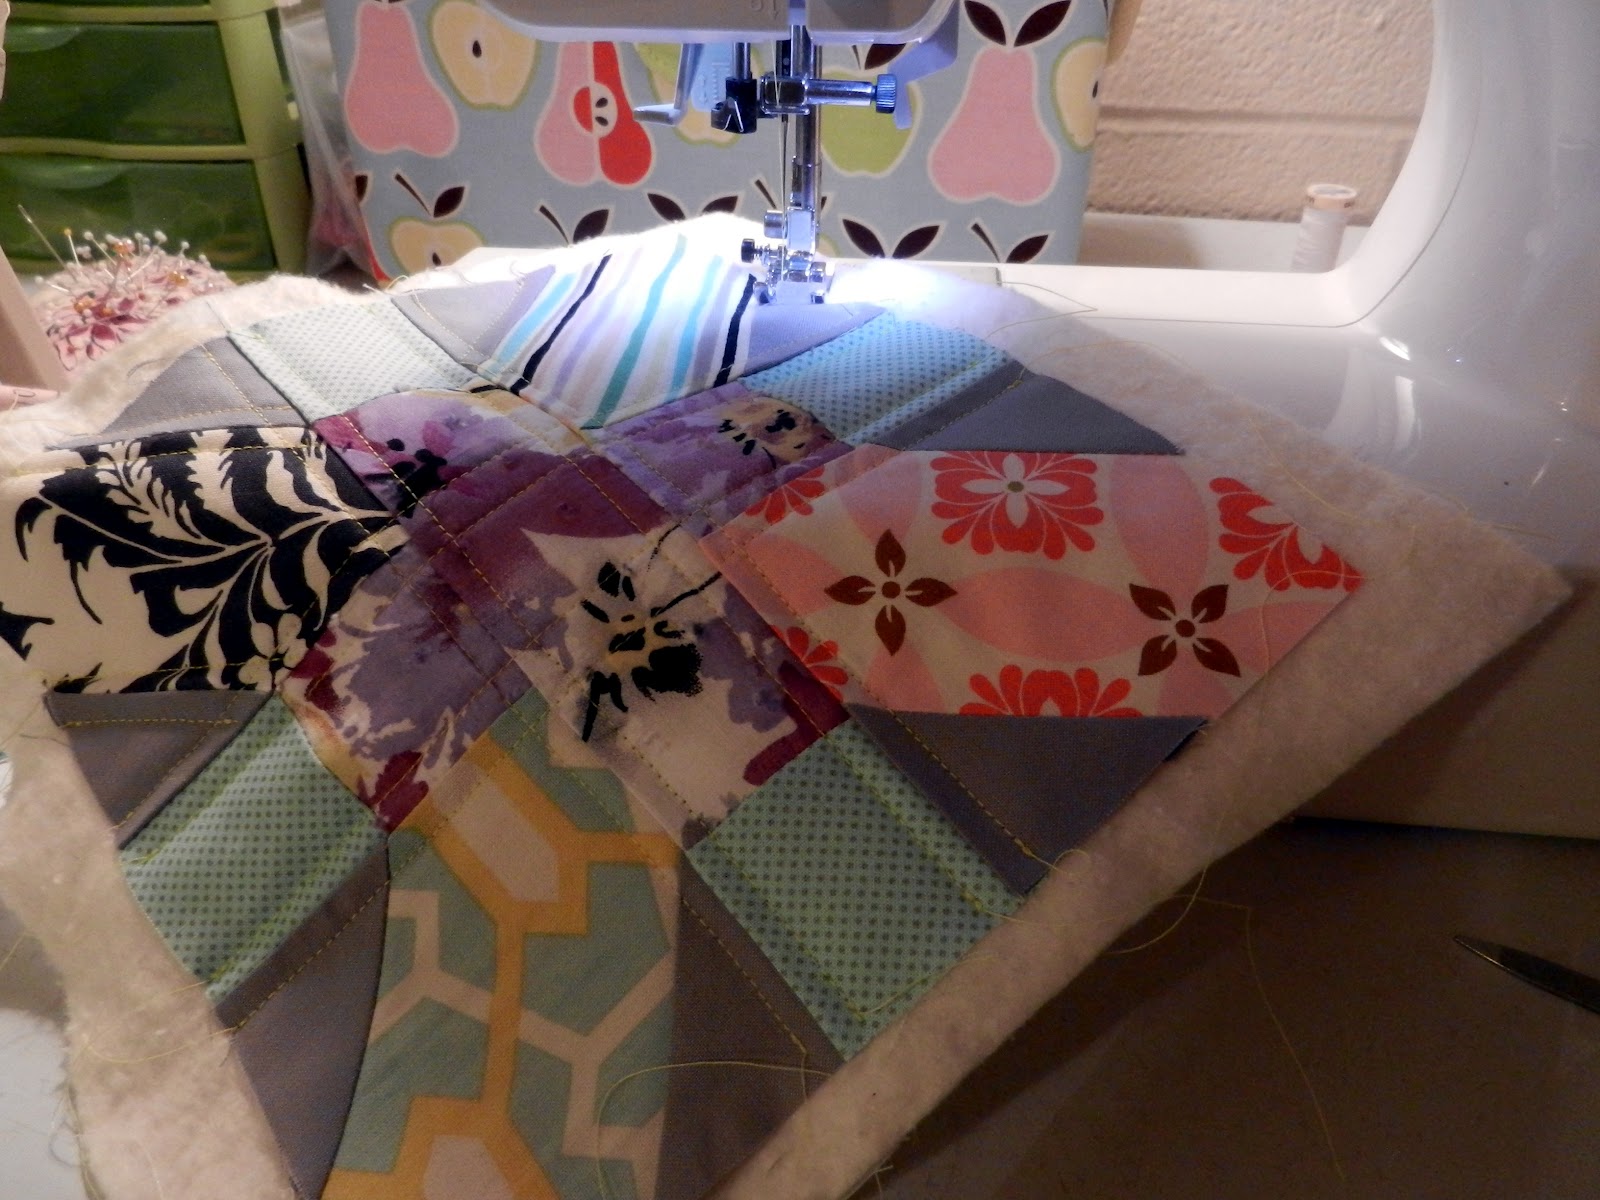
Over the weekend, I decided to cut into some of my new stash! I'd always wanted to try out triangles, but I'd always been a bit apprehensive. I'm soooooo glad I decided to do it! I made this pillow, and I really think it's my favorite thing I've ever made. Seriously. It is so me. The color palette, the texture, the subtlety yet pops. I love it! I might even make a whole triangle quilt in this fabric.... we'll see... I have like a bizallion other things to finish!

This Tutorial Tuesday/Thursday is on how to trim, sew, and iron your triangles and rows. I used this tutorial to learn how to cut, and this tutorial to get a basic idea on sewing and ironing. Both are from On the Windy Side. Below is my adaptation! (I'm LAZY, so my version has you ironing the seams after all of the triangles in a row are sewn together.)

P.S. The colors are bit off in the pictures. I really just didn't feel like editing them.... Sorry!

Trimming


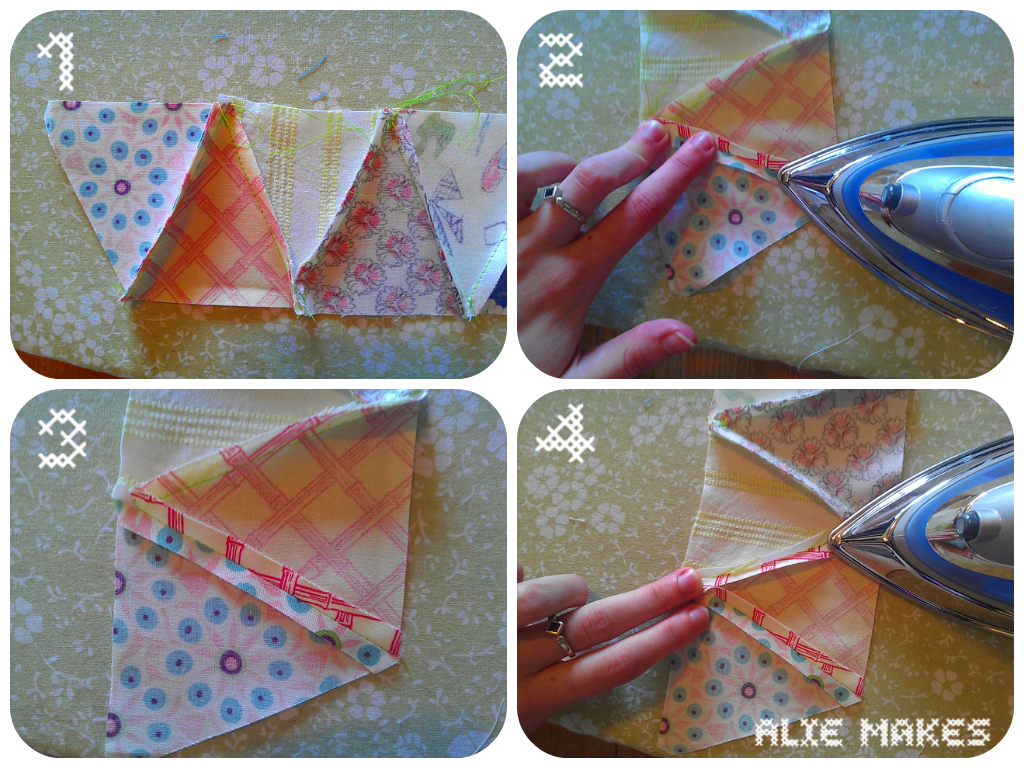
1) The triangle ruler that I have is set up so that only one of the corners is trimmed. Let me say this so you don't fall into a triangle nightmare like I kinda did.... trim all of your corners or trim none of your corners. The picture is showing one that has been trimmed and one that has not.

2) To trim the other corners, line up the trimmed corner of the ruler with your untrimmed corner of fabric like pictured above. Make sure that both sides have equal fabric and that the triangle that has been printed on the ruler lines up with the corner. Cut along the edge.


2.1) After you've trimmed all of your corners, stack the triangles in order that you want to sew them in. Also, put them in the direction that they are to be sewn. To form a straight row, they must alternate with the "top" corner pointed up and the next one pointed down and the next one pointed up, and so on.


Sewing


1) Lay out the two triangles you want to sew first. It's always good to lay them out, just to make sure you don't sew them wrong ;)

2) Lay the right hand triangle right-side down on top of the left hand triangle. Make sure to line up the edge that the two triangles were touching at when you just had them laid out.

3) Sew along this edge on a scant 1/4" seam.

4) Open the two triangles. Do not iron.


5) Place your next triangle on the right side of the two triangles you just sewed together. Make sure that it is pointing in the correct direction. This would be that the "top" point is pointing in the opposite direction of the triangle sewn before it.

6) Lay the right triangle on to the left hand triangle with right-sides together. Again, make sure to line up the edge of the two triangles where they were touching at when you had them laid out.

7) Sew along this edge on a scant 1/4" seam.

8) Open up the triangles. Proceed to sew your remaining triangles in the same way as described above, until you have finished up your row.


Ironing


1) Once you have finished sewing all your triangles together, the seams should look something like this.

2) Iron your first seam open. I iron from the free side where my seam isn't crossing over another seam.

3) It should look like the picture once you're done ironing your first seam.

4) Iron down the next seam so that the seam is pressed open. You will end up ironing on top of other seams. This is okay. It is also okay to begin ironing on the free side of the seam, or on the side where it crosses over another seam, however, I find that it works best ironed on the free side (not like I have pictured.. ooops).


5) After you've pressed the second seam open, it should look like this. Here you can see how one seam was pressed over another.

6) Press the next seam open like described above. You an see how one side of the seam is pressed under the other seam. This is fine! In fact, one end of most of your seams will be pressed under another seam. Pretty much let the fabric dictate where to go.

7) Finish pressing all of your seams open.

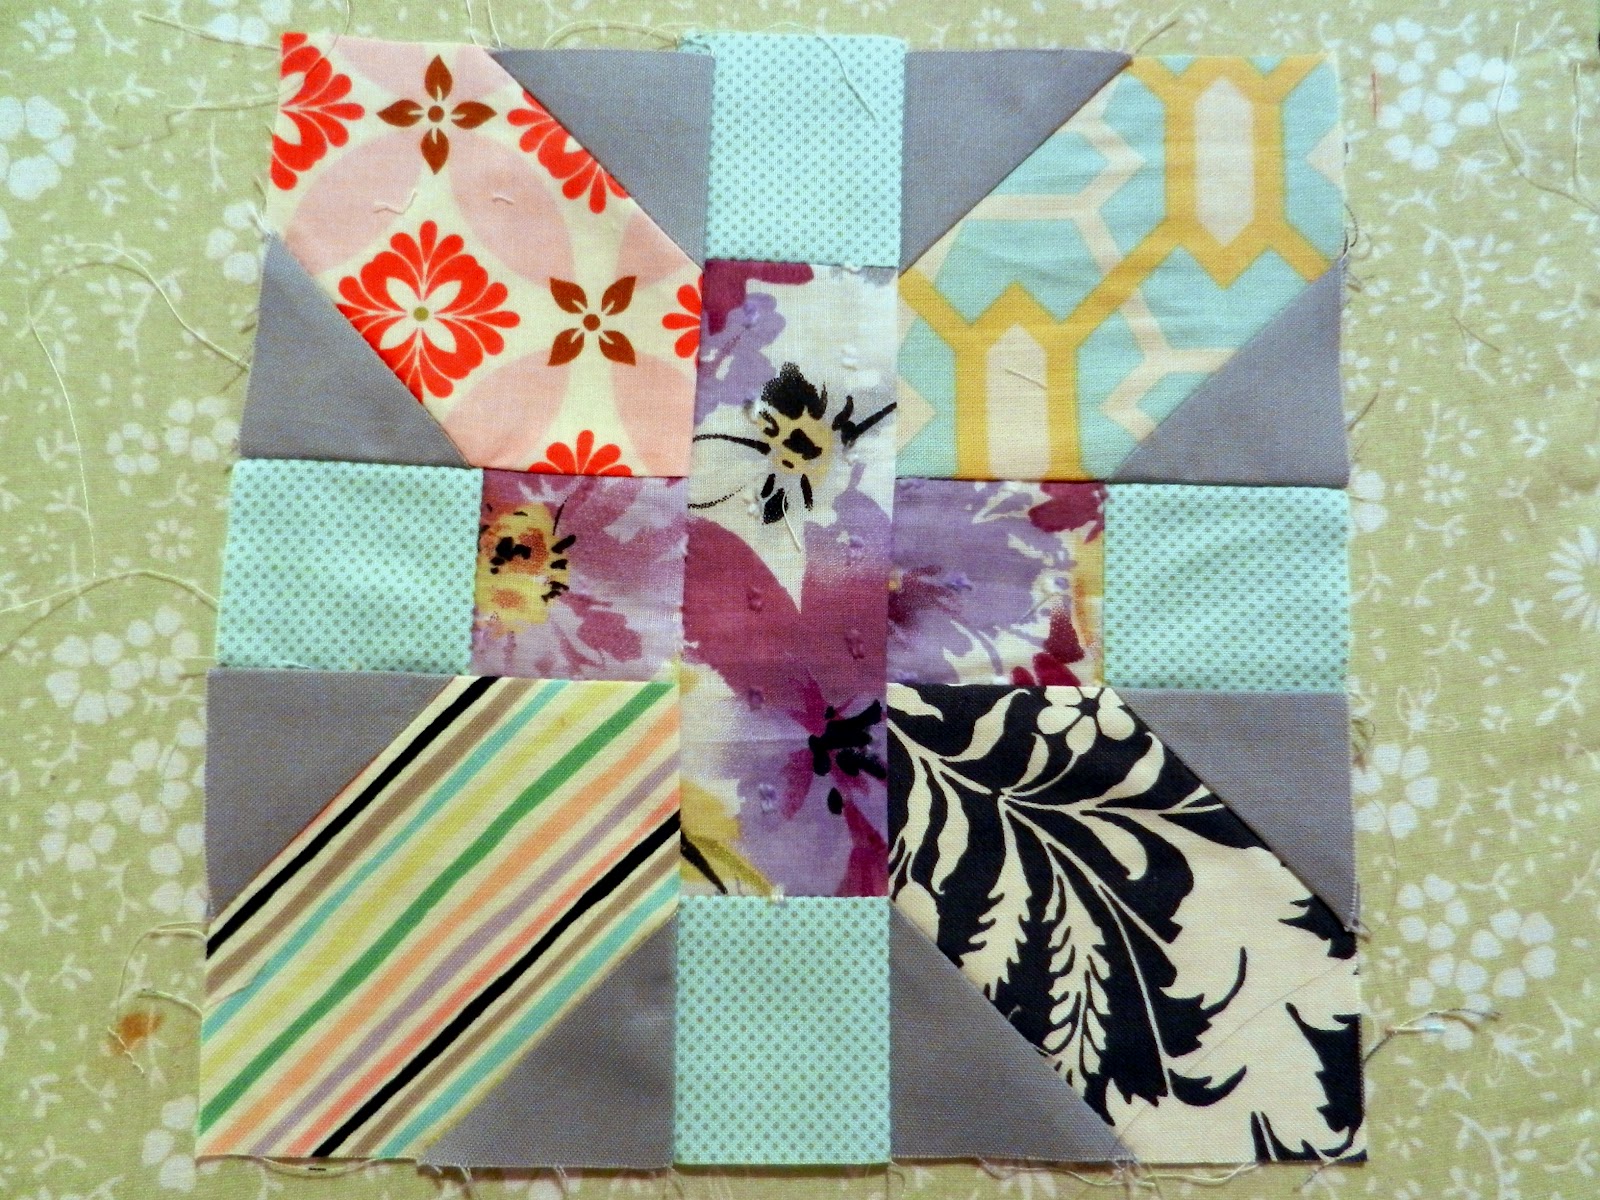
8) What your row should look like on the front after all your seams are pressed open.


And there you have it! Just sew your rows together and create whatever you want! I made my wonderful, totally-me pillow. I did make it a bit too long, but it still think it is perfect. If you make something using my tutorial, please send me pictures! I would love to see what you've created.

Anyone interested in doing a triangle block pillow-a-long??!

P.P.S. Come back tomorrow for a surprise guest blogger on a new series I'm doing on fabric stashes!
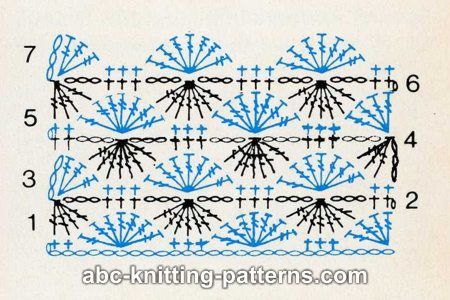


Tuesday, May 21, 2013

Tutorial Tuesday Linky Party #1


So this week for Tutorial Tuesday I've decided to host a linky party! This will most likely be happening every other Tuesday. I don't always have time to try out a new tutorial, so this allows me time to do sew (hehe), and for you to share what you've been working on.

Rules (just a few!) for entering:
1) Link up must be of a project you recently made or are currently making in the form of a blog post or Flickr picture. This can be anything sewing related.
2) Project was preferably made using a tutorial you found online or one that you created.
3) There must be a link back to the tutorial, if one was used.
4) Please link back to this post and/or put a button on your post (found below). This is completely optional, but would be greatly appreciated!
5) Visit a few of your fellow quilters' posts, and leave them lovely comments!


Tuesday, May 14, 2013

Tutorial Tuesday: Fold-Over Binding


Ever realized your backing fabric would look great as your binding? Then realized you didn't have enough of your backing to cut out binding strips? Well you are in luck! Today I will be featuring a tutorial I made myself on what I'm calling, fold-over binding. This is a quick and easy way to bind your quilts, pot holders, or whatever else you may be binding. But what is it? It's where you simply take the backing and fold it over the front to be your binding! Easy! Plus, it adds less bulk to what ever you're binding, as my friend Susie pointed out!

Now on to the sea of my tutorial... if you need something clarified a bit more, let me know! The tutorial will start from the point where you would normally make the binding. 


1. Cut the quilt top and batting to the size you want. Make sure to not cut the backing in this process. Next, trim the backing down to be 1 inch outside of your quilt sandwich.


2. Here is a picture of my whole wall hanging with the backing cut 1 inch around the top and batting.


3. Another picture of the same thing, but closer up.


4. Fold and iron the back in half along the edge of your sandwich. Your "binding" should measure an 1/2 inch now.


5. Iron down one side, leaving the corners like this when you come to the next side.


6. When ironing the next "binding" side, fold the "binding" over so that it covers the first side creating a nice corner.


7. Here is a far off picture of the binding ironed down to an 1/2 inch all around the quilt top and binding.


8. A bit closer now...


9. Once you've ironed down all sides, fold the "binding" over the quilt top and batting on one side, and secure down like you would with real binding. (Yes, I used bobby pins. There's a first time for everything!)

*Pin one side, sew, pin the next side, sew, etc.*


10. Sew the "binding" down as close to edge as possible.


11. Sew all the way down the length of the side of the "binding". Even over the side that is not folded over the quilt top and batting like shown.


12. Fold over the next side of the "binding" like you did before. Sew as close to the edge as you can, and sew over the other side of the binding that is already sewn. This form a nice corner.


I hope you enjoyed this tutorial, and will try it out sometime! Sorry if the wording was awkward or didn't make sense. It's my first tutorial :) If you do get confused, take a look at the picture and send me an email. Oh and don't forget to enter the Sew Me A Song Giveaway! It closes on Friday May 17th at 11:59 pm.


Wednesday, May 1, 2013

Tutorial Tuesd... Wednesday: Patchwork Pouch


Last week I gave you a little sneak peak at this pouch I made. Well, here is the tutorial, Patchwork Packet! It is on a Chinese sewing site called, Sew Lover. The links above will take you to the Google Translation page of it. Due to it being translated from Chinese, there were a few parts that were unclear or, I felt, were left out. On this tutorial I will clear up those parts and walk you through them!

Each one of my pictures has a number either in the top or bottom corner on the right hand side. My description of each picture will correspond to that number. I will also put the number that it corresponds to in the Chinese pattern. It'll look like this: 2.9: Where the first number is my picture number, and the second number (after the ".") is the pattern step number. Not all of their steps are numbered, but if you count their pictures, it lines up with those that are numbered. Some steps on the pattern I don't explain here. This is due to the Chinese pattern being self explainable I think. Let's get started! If you need another part of the Chinese pattern explained or a part I did explained better, let me know.


1: Here is the fabric I chose to use for my pouch. The floral is a linen from Joann's, and the other's are from my stash. You could easily use fat quarters for this project, but make sure you have enough for the binding.


2.3: I cut my squares to be 2 1/8 inches. It asked for 5.5 cm. I then arranged my squares a bit differently from what they showed, but I constructed it in the exact same way.


3.4: To cut the corners like the pattern shows, I used a tea cup to get the curve I wanted. I think next time I'll use a wider curved edge... this ended up being a bit too narrow for the binding to go along smoothly.


4: Here I traced around my top pattern onto the lining. This part was left out of the pattern, so I just improvised. I just lined my ruler up and used my water soluble marking pen, then cut it out.


5: Next I pinned my top onto my batting and hand quilted. This was also left out of the pattern.


6.5: Step 5... well I ended up needing to make a few adjustments, which you will see in the next two pictures as to why you need these adjustments. Where it shows to sew the lining is correct, but sew it on a 1/2 inch seam allowance and not on a scant 1/4 inch. It will fit much better now as a lining. Trim along the seam as well.


7.8: This is where I realized I needed to sew the seam on the lining at a 1/2 inch and not a 1/4 inch. I also realize that I needed to trim down the lining as well. Here you can see how far over the top it is.


8.8: I pinned in the lining before I trimmed it. Make sure to place your pins on the lining side and not the top side. This is because you will sew the lining in from the inside. Sorry you can't see my pins!


9.8: Here is after I have sewn in the lining and trimmed it to be flush with the top and batting.


10.8: This happens before my step 9! I accidently put it in the wrong order. Sorry! It's just me sewing in the lining.


11.14: I did not wrap my zipper in fabric at the ends like they did in the Chinese pattern. I ended up buying my zipper a bit too long, and since it's metal, you can't cut it to alter the length. I did sew it in by hand though. Should have used the back stitch like they showed, but somehow I missed that! Here I'm showing the first side. I simply lined up the edge of the zipper teeth with the top of the binding. I then sewed it how they showed along the bottom of the binding.


12.15: I'm sewing the other side of the zipper here. I needed to unzip it so that I was able to grab my needle when it was inside the pouch. Again, I lined up the bottom of the zipper teeth with the top of the binding, then sewed it in along the bottom of the binding.


All finished up! Here is the patchwork pouch completed. I might re-do my zipper though. Not quite as happy as I'd like to be with it. Both sides of the pouch are a little askew because I didn't sew the zipper in quite long enough. I also want to back stitch it in and not what I did. All in all though, I love the fabric I used and the design of it!


Did you make one!? Send me an email, and I will put it up on my blog!

Wednesday, October 10, 2012

Tutorial Tuesday: Pencil Case

A day late for Tutorial Tuesday, but my Internet has decided to spring up for a few minutes so..... This weekend I decided to finally tackle a pencil bag tutorial I'd found months ago. The tutorial is from A Spoon Full of Sugar and can be found here. At first glance, it looks very confusing and hard, but let me reassure you. It's not!!! The pencil bag comes together so easily. If a written direction seems a bit confusing, just look at the picture. They snapped pics at the perfect moment to explain a direction. Honestly, the only hard bit I hit was with the zipper... which is entirely my fault and not the tutorial's! I am horrible at zippers! These are probably the best zippers I've ever put into something. Ever. Really. It's true.
The above is my first pencil case! I had been needing one quite badly. I use many different colored pens when I take notes (I'm a kinesthetic and visual learner so switching colors for different meanings helps me tons!) and lately I couldn't find any of them. I woke up and just made it. The fabric are left to right as follows: light colored linen (from Joann's), orange elephants (from the scrap pack from Sew Me A Song), Sundials in Glow, and Music Room in Black. The inside is Sundae Stripe in Lime. I embroidered on the linen to add some personalization. I used a filling stitch called Square Boss. Currently this one is stuffed with cough and throat drops, allergy meds, and carmex... can you tell I have allergies or possibly a cold right now?
The second one I made was completely on a whim. I had the flower piece already cut out (I was going to use it in the first one instead of the linen), so I decided to go ahead and throw one together. It didn't come out quite as good as the first one. I had more trouble with my zipper, the stripes' seams didn't match up, and the end ribbon frayed. Oh well. I still love it! I also used some scrap from my mom's cheetah material on the inside. I'm falling in love with cheetah print! The other fabrics are as follows from left to right: light colored linen (from Joann's), actually I'm not sure what all of these are from. The aqua one is from my most recent Stash Stack Club stack, I think the next is from a Chez Moi design, and the last is Ruby Dot in Ruby. Embroidary is tiny french knots. Currently stuffed with an assortment of highlighters and pens.
Another pic of them together. I got tired of seeing my wood floor as the background so I used a blue tray I have. Please ignore how dirty it is!!! I also want to thank you all for being patient with me and my posts. Internet is really off an on which means my posts are as well. I hope you all are having a fab week so far! Go check out that tutorial and send me a picture of what you create... I'll post it on here :) I will leave you with a picture of a mashup of french knots I did on the second pencil case.

Tuesday, October 2, 2012

Tutorial Tuesday: Quilt Alongs

As some of you know (if you read this blog!) that I have joined a quilt along. I know this isn't necessarily a conventional tutorial, but I believe that QAL's really do help us quilters. I'll throw in a picture of my first completed block from the Spinning Stars QAL I am apart of... that way this post isn't super duper boring!
The first block is complete!!! I'm going to start on the second one soon :D
Okay back to the benefits of QAL's. 
1) They help you to try new blocks and techniques that you might not try on your own. I most likely would not have tried making this quilt by myself. I only began doing it because I saw Katie talking about doing a QAL with it. I decided to take the plunge and try something new that I wasn't exactly super drawn to. I am getting some excellent practice with being more precise with my sewing skills. I'm not very careful with keeping my seams super straight. I've discovered that if I ever want to make blocks that are more advanced and need exact sewing, then I need start paying attention. This block has definitely been an excellent teaching device for this. I must match everything, but it isn't too big of a deal if it is off just a bit. It gives me some leeway to really delve in and learn!

2) You get a chance to directly interact with fellow quilters. Everyone in a QAL is working on the same thing. Information is shared, little tips and tricks are given by those who encounter them along the way, and if you're having trouble someone is always there! Of course this is only with a QAL that has some sort of message board or email ring set up. The Spinning Stars QAL is through a Flickr group so we use the message boards. Pic below! Everyone seems to really like sharing information with each other, which is soooo helpful!
3) You have a sense of community filled with inspiration. Members of the QAL become familiar with each other and what everyone is working on. You get to see so many different ways people interpret a particular block, project, or quilt. Everyone has different fabric tastes and layout ideas, of which all the members are supportive of. They are also so encouraging! Wanting to share what my blocks looks like and getting encourage words really keeps me sewing up my Spinning Stars blocks. Plus looking at the beautiful blocks everyone else is coming up with, inspire me to keep going.
I hope everyone found this helpful and are now going to go join a QAL!! Have a good day :D

Tuesday, September 18, 2012

Tutorial Tuesday: Scrappy Japanese x and +


Well after what seems like forever, I am finally putting up my next Tuesday Tutorial!! Yay! Today's is featuring Amy of Badskirt's tutorial for a scrappy Japanese X and + block. I saw this tutorial months ago and just fell in love. I love it by itself and in a whole quilt. I decided one night after staring at it for months, to just go ahead and make it. And I did. And it felt wonderful! Plus I think it turned out pretty well ;) I entered it in a contest over at the Quilting Board Forum, so I had to wait for that to be done before I could show it. Here are some pictures for you! *Warning: Pic Heavy*
I went a picked out some scraps I had laying around. Some were left overs from my quilts, leftovers from my mom's sewing adventures, and some from my stash. I didn't think too much about them matching. Just grabbed what I liked.
After cutting everything out... I highly recommend opening Katy's diagram that show what to cut, how many, and of what. It kept my mind straight.
Sewn up a bit.

Sewn up a bit even further.

Bound!
Here it is completed! I guess it's a square mug rug. Or at least that's what I'm using it as. It hangs out on my side table and is perfect for a cup or to go under a hot bowl. Please notice the yellow machine quilting. I am so pleased with the yellow! It's subtle enough, yet strong enough to bring everything together.
Yellow.

A bit closer in.
And now I leave you with a picture of my square mug rug in use! My mug/ tea cup is presenting it so nicely, along with my side table sewing basket. I keep thread and scissors in there. Especially handy while working on hand quilting. I hope you try out this block! I really enjoyed sewing it up, and I'm kind of planning on making a whole quilt of it. Cheers!